Lace frontals are blowing up right now.
And it’s only getting huger.
The questions are:
What is a lace frontal sew-in?
And how to sew in a lace frontal(360 frontal closure included)?
…Well, that’s exactly what you’re going to learn everything about lace frontal in this guide.
So without further ado, let’s get started.
What Is A Lace Frontal Sew In?
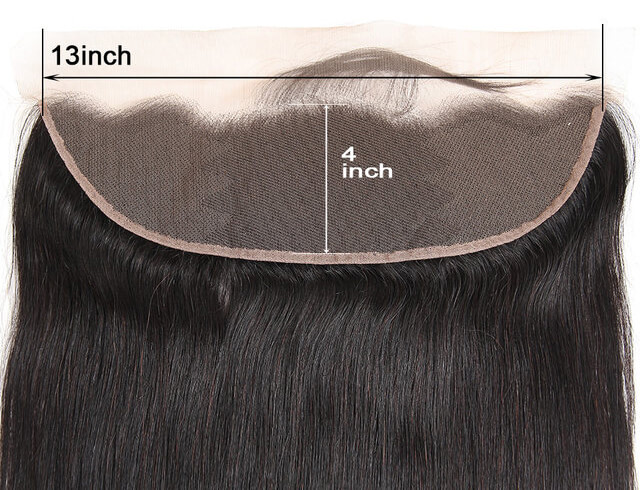
A lace frontal goes from ear to ear and covers the front of your entire hairline. It’s typically 13” long and 4” wide.

Lace frontals complete your desired look of a sew-in by closing off the installation, eliminating the need for leaving hair out in an attempt to create a natural look.
If you need a bit more coverage, a frontal is a perfect solution, as it completely covers your hairline.
Pros and Cons of Lace Frontals?
Lace frontals serve a similar fundamental purpose as lace closures. But, the most obvious difference between a closure and a frontal is the size of the lace.
Although lace frontals provide their wearer with the most styling versatility, it also has pros and cons.
Pros
+ Versatility – Allows you to change and adapt your parting the way you wish.
+ Protectiveness – Eliminates the need to risk heat damage.
+ Flawless Install – Looks like growing directly from your scalp.
Cons
– Price – Can be quite expensive.
– Lifespan – Don’t last too long.
If you want to try something different and enjoy changing up your look often, frontals remain the most appropriate option.
For those who want absolute styling freedom, 360 lace frontals will do just fine.
SIDENOTE: 360 frontals have more hair, which allows you to use fewer bundles.
How To Customize Your Lace Frontal Sew-in?
Now you might be wondering :
Why do you need to customize your frontal?
When you view up close your lace frontals, you will see the knots in your lace. And the hairline of most lace frontals is unnatural.
To solve these problems, here’s the quick answer:
- Bleaching the Knots
- Plucking the Hairline
Specifically, I’ll explain…
Bleaching the Knots
Bleaching the knots helps to reduce the netting appearance of the lace and create the shade of a natural scalp.
Let’s see the techniques, tips, and tricks of Ashley Bedeck on bleaching the knots.
So, in this regard, it comes down to personal choice.
Plucking the Hairline
To make lace frontals appear natural, you can pluck some hairs into the hairline’s shape. And it looks best when this frontal has been plucked to mimic your natural hairline.
Here’s a youtube video of how she plucks her lace frontal sew-ins:
As you can see in the video, when finished plucking the hairline, the baby hairs add to the illusion that the frontal grows from the scalp.
But, if you are not confident in plucking the hairline, get your hairstylist to do it for you!
How To Sew In A Lace Frontal(No Glue)?
If you love to browse YouTube for some amazing videos, you will see various tutorials on installing a lace frontal securely.
Sewing in frontal can be quite difficult if you don’t have proper instructions, so I’ve put together five major steps to show you how.
Here are the things you will need:
- Lace Frontal Closure
- The Weaving Net
- A Comb
- C Needle & Thread
- Shears
- Hairpins
- Razor
- Adhesive/Gel
Step 1 – Braiding Your Hair:
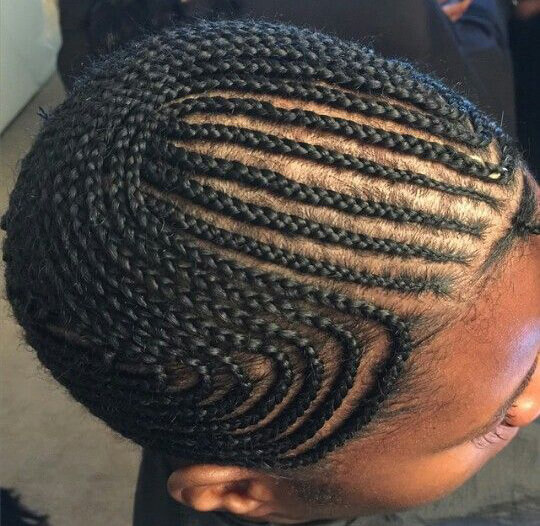
Cornrow your hair braiding the top/middle section back for the placement of the frontal and bundles weave.
Then, put on the weaving net so that it makes it easier to sew in-between braids.
Remember: Make sure the braiding pattern is flat.

Step 2 – Place the Frontal:
Place the frontal onto your head and adjust the frontal to where you want it placed.
Step 3 – Start to Sew:
Make sure that when you do this, you start sewing the sides of the lace frontal down first and then the back. Once done, trim the excess lace off to create a natural hairline.
Step 4 – Create Baby Hair :
Take a few strands of hair from the frontal, and using a razor, trim the hair strands to create baby hair. Then, using hair gel, lay down the baby hairs, so that it looks even more natural.
Step 5 – Finishing :
Finish weaving the rest of the hair with the longer bundles, and style as you desire.
Need more? Watch the video below for a demonstration on how Ashleigh Nicole helps her client to install her lace frontal sew-ins.
How To Take Care Of Lace Frontal Sew In?
Whether you’re new to lace frontals or have used frontal closure in the past, it’s always a good idea to know more about how to take care of your frontal.
With regular care and attention, you can ensure your frontals last as long as possible and stay looking healthy. Here are some tips:
Don’t Treat Frontals Like a Real Scalp
Although lace frontals mimic a real scalp, you can’t treat them like you would a real scalp. You need to proceed with caution.
Based on the construction of the frontal, you should brush the hair from the ends, working your way up to the root while holding the hair at the root to prevent shedding.
So, as a rule of thumb, no intense scrubbing/combing, no excessive tugging, no rough handling, no scratching, or no vigorous washing.
Use the Proper Hair Care Products
When searching for products to use always look for hair care that is gentle, organic.
Always use sulfate-free hair care infused with safe and effective ingredients to keep your hair looking flawless and lusher.
Keep Way From Extremely Heat
Extreme heat will damage the hair. So, don’t get too close to the fireplace and avoid hot irons.
How Long Does A Lace Frontal Sew In Last?
The lifespan of the lace frontal is determined by how well it is taken care of, how the quality of the frontal, and how often it is worn.
Usually, the lifespan of frontal closure is 2-5 months or longer, depending on whether or not use glue, what type of glue you use, the skill level of your stylist/you, and the general care it receives.
Now It’s Your Turn
And now I’d like to hear from you:
Do you exactly know what a lace frontal is?
How to apply the lace frontal?
Or maybe you have a question about something you read.
Either way, let me know by leaving a comment below right now.